
Test Equipment for the New Ham, and other Hams, as well
I bought a new portable antenna. I have family responsibilities, so it took me a while to take it out and try it. It would not work. What was wrong with this antenna? I had seen videos of other amateur radio operators who had good results with the same antenna. I tried a Parks on the Air (POTA) activation with the antenna, that was unsuccessful. It took seemingly hours to tune up the new antenna. I announced my presence on the POTA web site (pota.us) people could hardly hear me, yet I was pumping out 100 watts. My thought was, “It is my antenna, or am I doing something wrong?”
I had set the antenna up in the back yard and confirmed that it was set up correctly. I had a 50-foot cable from my radio to the antenna through our basement door. Still, it would not tune. OK, time to bring out the test equipment to see what was wrong. What if it was the cable that was bad? My antenna cable was one I bought specifically for portable operations. It still looked new. The antenna cable couldn’t be the problem, could it? The first thing I did was to use my multi-meter. Multi-meters are cheap. They can measure direct current (DC) and alternating current (AC) voltages. They also measures resistance. Well, let’s check to see if we have continuity in the antenna cable. I pulled the cable completely into the basement for a check. I used the ohms (resistance) setting to see if the center conductor had continuity from end to end. It did. The shield had continuity from end to end, too. Next, I put one lead on the center connector on one end and put the other lead on the shield. I should read a short (zero ohms) if there was a short in the cable. I would read infinite resistance (an open) if there was no short anywhere in the cable. That was exactly what I had. No problem so far. 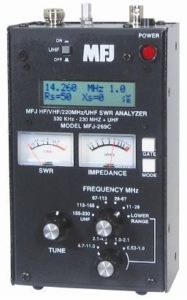
Now it is time to bring out the big gun, my antenna analyzer. Every ham should have a multi-meter, and every ham should at least have access to an antenna analyzer. There are several kinds, and they all work differently. I hooked my antenna analyzer to one end of the cable. I re-connected the antenna on the other end. I had set the antenna to be resonant at least somewhere near the 20-meter band. Let’s see what kind of readings I get. I hit a spot of near resonance about 12 MHz, and one about 4 MHZ. I checked the entire HF spectrum. I adjusted the antenna everywhere, and the readings were the same. Now I am really beginning to suspect the cable, new or not. I decided to check it out with a dummy load. There is one problem; I don’t have a dummy load! I didn’t have a clue who had one I could borrow. So, I did the next best thing. I made one. Antenna analyzers are actually milliwatt transmitters, so I did not need anything spectacular. I needed a 50-ohm load, so I made one! I had a spare mountable SO—239 connector that a coax cable fits into. I also had bought a bunch of 100-ohm resistors. Remember, if you hook two 100-ohm resistors in parallel, you have 50 ohms. I hooked the resistors across the SO-239 connector. Wala! I have a 50-ohm dummy load!
I put the dummy load on the one end of the cable with my antenna analyzer on the other end. If the cable were good, I should have a flat 50 ohms throughout the spectrum with nearly perfect SWR (standing wave ratio). I didn’t. The results identical to when the antenna was connected. Conclusion: my “new” cable is bad. Fortunately, I had a spare cable (good idea to have). I hooked it up to the radio and the antenna. I fired up the rig. I was on 20 meters, and contacted a station in Pennsylvania. So, it wasn’t the antenna after all! Having the right test equipment can make all the difference.
73, KJ4CMY
David Harden